Picked up my annual "Winter Project".

Stories, News and General Yakking
Bkeepr
Posts: 276
Joined: Fri Jul 12, 2019 7:23 am
Location: West-central Maryland

Re: Picked up my annual "Winter Project".

Post by Bkeepr »

PHPaul wrote: Mon Nov 20, 2023 6:23 am ...I'll probably wind up selling it for less than I have invested in it when I'm all done.

That's
entertainment!

Looks like a perfect winter project. My version is similar, the thing I was doing with the antique clocks. I'd pick up broken antique clocks "cheap," spend a lot of hours and some money on diagnosing and repairing them so they'd run like new. But here's my difference: once I had them running well, I couldn't bring myself to sell them, or give them away. So I now have a closet-full of 100 year old clocks, just waiting for my kids to throw or give them away when they're cleaning out my estate. :lol:

Anyway, keep the pictures and narrative coming, I'm very interested in what you find and how you fix.
PHPaul
Site Admin
Posts: 483
Joined: Fri Jul 12, 2019 6:43 am
Location: Downeast Maine

Re: Picked up my annual "Winter Project".

Post by PHPaul »

Nothing picture-worthy, reinstalled the radiator and have the engine oil and shaft drive lube draining. Need to lube the throttle and clutch cables.

I'll be in town later today, I'll pick up oil, gear lube and some distilled water and refill all the fluids. Probably grab a battery while I'm at it. If so, I should be able to post a link to a video of it running before the weekend.

Need to take a good look at the mufflers and decide whether to fix or replace. It needs tires and I have to decide what to do about the seat and side covers. First attempt at side covers will be fabbing up my own. A good bath and thorough cleaning too.
PHPaul
Site Admin
Posts: 483
Joined: Fri Jul 12, 2019 6:43 am
Location: Downeast Maine

Re: Picked up my annual "Winter Project".

Post by PHPaul »

https://youtu.be/rUFjdm8hiP0?si=1ZgpXV_rz9zhmCM3

Link to the video of first start on the project. Apologies for the noise, had a fan running to clear the fumes out of the shop. Also just a quick and dirty hand-held phone video so not great quality.

So far I've rebuilt the carbs, replaced all the o rings in the cooling system, rebuilt the front brake caliper and master cylinder, changed all the fluids and dropped a new battery in it.

Starts and idles pretty well considering there's no air box or air filters on it and I just ball-parked the carbs after rebuilding them.

Next steps are to bleed the front brake, check the charging system, see about air filters, and rejet as needed.
PHPaul
Site Admin
Posts: 483
Joined: Fri Jul 12, 2019 6:43 am
Location: Downeast Maine

Re: Picked up my annual "Winter Project".

Post by PHPaul »

Today's task was to try out an idea I had to replace the missing side panels on the bike. They ARE available used...for $200...per side... :o :shock: The CFO here at Cheap Charlie's Motorcycle Emporium ain't gonna go for that. On a rare and valuable bike? Sure. On a mass-produced Honda that won't return what I have invested in it if I put new tires on it? Nuh-uh.
panel1.jpg
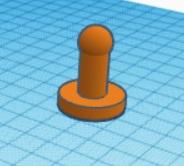
panel1.jpg (5.57 KiB) Viewed 4840 times
The original plastic panels were held on with cast-in studs that popped into rubber grommets. I sketched one up in TinkerCAD and printed it out on the 3D printer. The results indicated that A) it would work, and B) it would be rugged enough, so I printed out a handful of them.
panel2.jpg
panel2.jpg (25.25 KiB) Viewed 4840 times
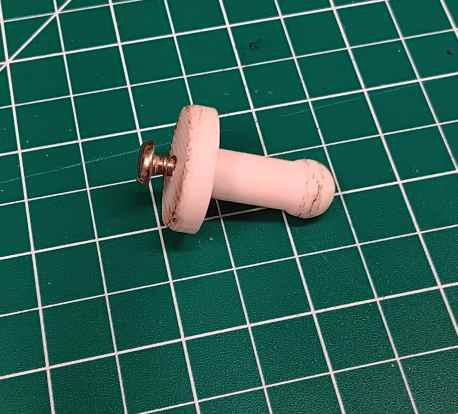
Then I drilled them out from the back so I could screw them to the panel. Past experience tells me that gluing them (and I've tried a half-dozen types of glue) doesn't work. I don't have the technology to print the whole side panel with integral studs so screwing them on was the next best solution.
panel3.jpg
panel3.jpg (14.03 KiB) Viewed 4840 times
Here's one popped into the mounting grommet on the bike. A little Vaseline helped with insertion. (Where have I heard that before???)
panel4.jpg
panel4.jpg (19.4 KiB) Viewed 4840 times
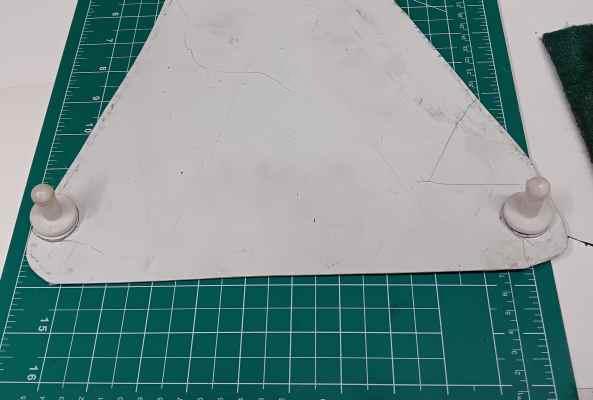
I screwed them to a piece of flashing as a test bed. I started out with CAD (Cardboard Aided Design), transferred that to a piece of flashing and used my belt sander to trim that to a rough fit.
panel5.jpg
panel5.jpg (12.68 KiB) Viewed 4840 times
Here's the rough panel attached to the bike. This is primarily a proof-of-concept exercise and the panel is essentially two dimensional where the finished product will need some 3D curves built in to fit properly and look right. Now that I'm reasonably confident that it will work, I'll scrounge up a piece of heavier aluminum and go to work. It'll also need a third mounting point added at the bottom.
Bkeepr
Posts: 276
Joined: Fri Jul 12, 2019 7:23 am
Location: West-central Maryland

Re: Picked up my annual "Winter Project".

Post by Bkeepr »

PHPaul wrote: Sun Dec 10, 2023 3:52 pm ...(Where have I heard that before???)...
:lol:


Great concept, and a successful POC test, to boot. Altogether an interesting project, with what appears to be a workable and sound solution.

I don't know if I'm the only one, but I look forward to more pics and progress. I know it is a pain to document and post your work, but I appreciate it.
PHPaul
Site Admin
Posts: 483
Joined: Fri Jul 12, 2019 6:43 am
Location: Downeast Maine

Re: Picked up my annual "Winter Project".

Post by PHPaul »

There are two more document-worthy (if you're REALLY desperate for entertainment...) projects in the works.

1 - The master cylinder has a sight glass so you can check fluid level without removing the cover. It's plastic, crazed and leaking and the mounting ring is rusted out. I was pointed to some replacement sight glass kits on Ebay and replaced it. That got done yesterday, but I can take a couple of pics.

2. The mufflers have cosmetic issues - aka rust - and have a couple of pretty much rusted out spot welds where the inner baffle is welded to the outer shell. Mechanically functional, but ugly. New mufflers are stupid expensive and this rebuild is on-the-cheap until I'm sure it's worth it, so until (or if) I decide to spring for new mufflers, I'll fix up the old ones. This will involve two steps:

A) Patch the weld divots with Extreme Temperature JB Weld and sand them back to shape.

B) Prime and paint with VHT High Temp Engine Enamel. Supposed to be good for 550° which should be fine out at the exit end of the mufflers.

I'll take pix of that as things progress. Might be a couple of days, I got other obligations on the calendar.
PHPaul
Site Admin
Posts: 483
Joined: Fri Jul 12, 2019 6:43 am
Location: Downeast Maine

Re: Picked up my annual "Winter Project".

Post by PHPaul »

mc1.jpg
mc1.jpg (23.39 KiB) Viewed 4774 times
This is the master cylinder for the front disk brake with the new sight glass installed. The MC worked okay after a thorough cleaning, and it was MUCH cheaper to replace the sight glass than the whole MC. You can see where I didn't get all the silicone off from my attempt to seal the old one. FYI, silicone and brake fluid don't play nice together... :roll:
mc2.jpg
mc2.jpg (10.16 KiB) Viewed 4774 times
This is the "kit" for replacement. 4 sets for $10.00 off Ebay. Probably never use the other 3 unless a friend needs one.
GeneMO
Posts: 157
Joined: Wed Aug 21, 2019 7:52 pm
Location: Speed Missouri

Re: Picked up my annual "Winter Project".

Post by GeneMO »

You need to come to my place and fix some of my 30 year old, stalled projects. My wife was looking around the shop the other day and said I sure hope you don't die before I do. :lol:


Gene
PHPaul
Site Admin
Posts: 483
Joined: Fri Jul 12, 2019 6:43 am
Location: Downeast Maine

Re: Picked up my annual "Winter Project".

Post by PHPaul »

muff1.jpg
muff1.jpg (24.98 KiB) Viewed 4736 times
muff2.jpg
muff2.jpg (27.5 KiB) Viewed 4736 times
This is what the damage to the mufflers looks like after excavating the worst of the rust. It's where the inner baffle is welded to the outer cone.

muff3.jpg
muff3.jpg (15.75 KiB) Viewed 4736 times
I patched it with JB Weld Extreme Temperature exhaust repair paste. Like an epoxy, but water based and good (according to the ads...) for 2400°
muff4.jpg
muff4.jpg (18.06 KiB) Viewed 4736 times
Patch sanded down and shaped as well as possible given the damage.
muff5.jpg
muff5.jpg (21.78 KiB) Viewed 4736 times
Entire muffler sanded enough to give what's left of the chrome some tooth so the primer will hold.
muff6.jpg
muff6.jpg (27.81 KiB) Viewed 4736 times
First coat of primer on. I'll hit it with another coat, let it cure overnight and put the gloss black finish coat on it tomorrow.
PHPaul
Site Admin
Posts: 483
Joined: Fri Jul 12, 2019 6:43 am
Location: Downeast Maine

Re: Picked up my annual "Winter Project".

Post by PHPaul »

Image
Post Reply